In this tutorial series, we'll introduce the fundamental concepts required to successfully create new rulesets, append rules to existing rulesets, refine rules, and deploying these to other projects. Each tutorial article is related to a video, so you can make the most of learning to utilize the features related to rules in Solibri. To get started, you can go and watch the introduction video to what this tutorial series is about.
In this first tutorial, we'll start the process of creating a new ruleset which contains Solibri's General Intersection Rule template, checking for clashes between the MEP and structural models. You'll first prepare the setup and then get to know the Ruleset Manager interface. From there, you'll continue to create your first ruleset, and finally you test the ruleset by checking the model. All the resources used in this tutorial series are delivered with Solibri.
Note
The video related to this tutorial article can be found here.
The first tutorial consists of four parts:
The very first step to you get started is to set the units correctly. To do this, go to the File menu, click Settings and then Units. Set the units and decimals to to the following values:
 |
Next, you need to select a role. It's good practice to select a role before loading the first IFC file for a project. Roles preload resources required for checking and classifying objects and information take-off processes that will follow. To select a role:
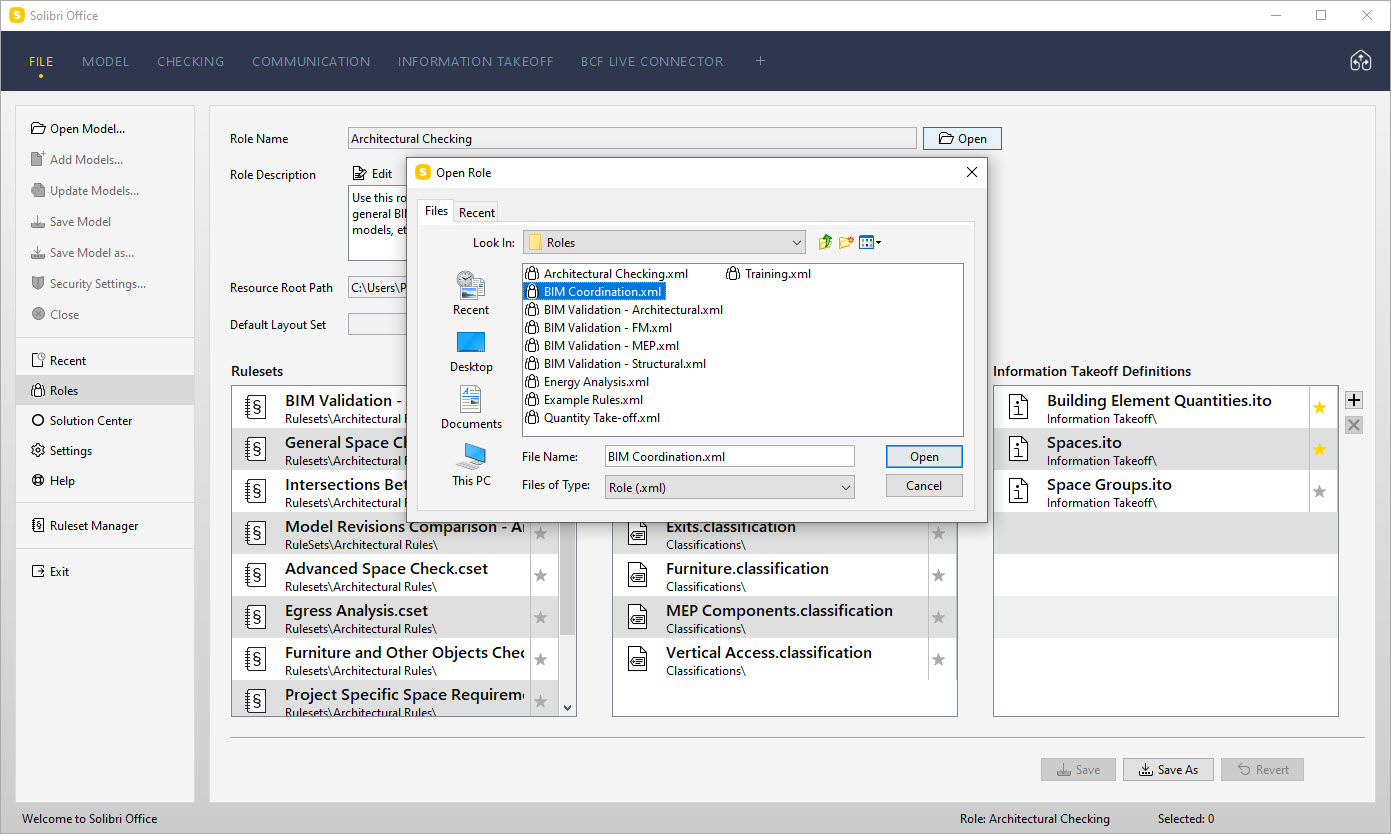
Go to the File menu and select Roles.
Click Open.
Select BIM Coordination from the context menu.
Click Open.
Now, you can load the three IFC models used in this tutorial. The files can be found in the default samples directory:
In Windows: Windows (C:) > Users > Public > Solibri > SOLIBRI > Samples
In MacOS: Applications > Solibri > Samples
If the models are available in the Recent Models list, then you can load them from there, otherwise click Open Model from the File menu, and select and open the following IFC files:
Solibri Building
Solibri Building Structural
Ventilation Model
When you open the models, the Ensure Model Disciplines and Categories dialogue opens. Set the values as shown, the disciplines will be used in the rules to identify components:
 |
New rules can be added to either existing or new rulesets. We will create a new ruleset to host our new rule. You can create new rulesets with the Ruleset Manager. To open the Ruleset Manager, go to the File menu and select Ruleset Manager.
Once the Ruleset Manager opens, the screen is divided into different views:
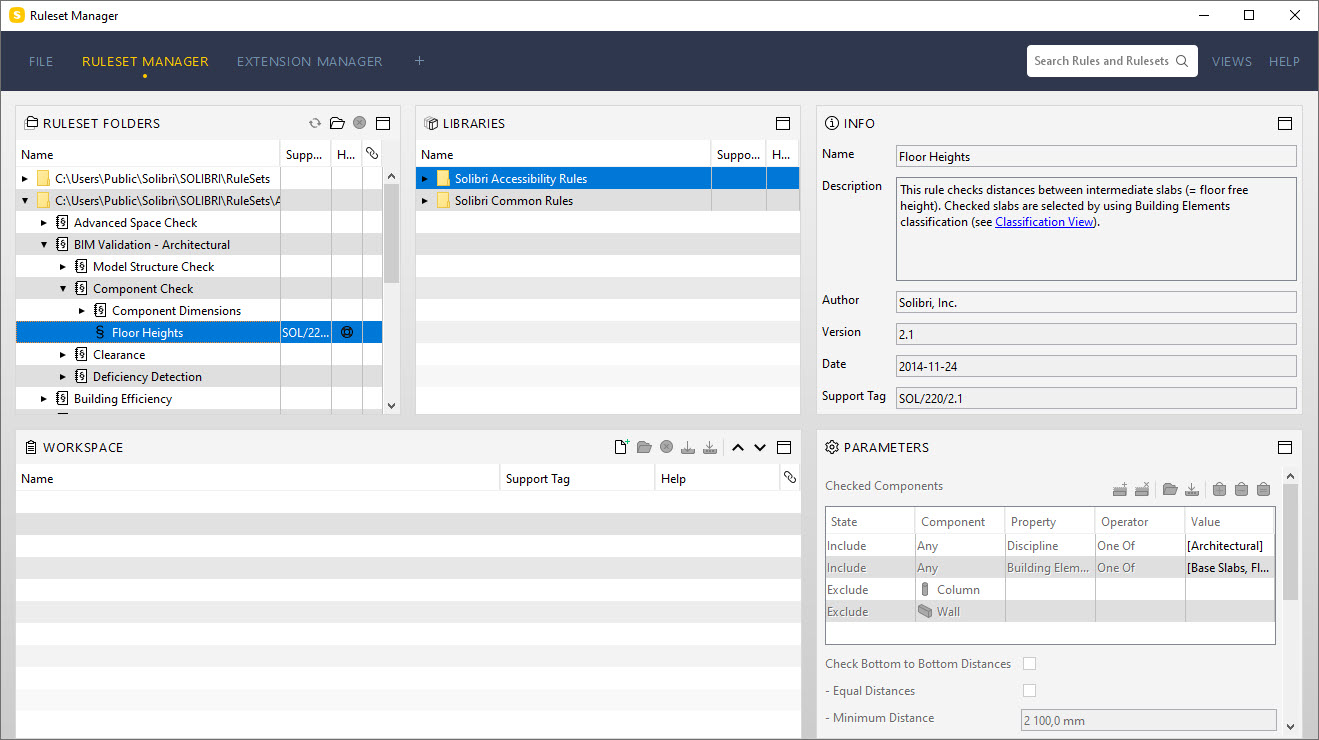
Libraries are the rule templates that allow you to configure your own rules. Each template is related to a specific type of check, such as data or geometry.
Ruleset Folders displays directories of pre-configured rulesets. Initially, this list will be the directories provided by Solibri, but later it should contain your own locations. All the configured rules in the Ruleset Folders view are generated using the library templates.
The Workspace view is where we define the templates used and the main structure of the ruleset.
The Info view for a particular rule allows you to set the names and descriptions relative to what you want to achieve, rather than the template name. If activated, the gatekeeper settings allow configuration of how sub rules receive data.
In Parameters, you can configure the current rule.
First, go to the Ruleset Folders view and select Rulesets Open in Solibri, located at the bottom of the view. This special location displays the rulesets which are automatically loaded in the Checking view. New rulesets created here will also be loaded automatically.
Then you can proceed with creating your first rule:
In the Workspace view, click the New Ruleset icon (
 ). If you expand the rulesets open in the Solibri folder in the Ruleset Folders view, you will see that your new ruleset appears along with the ones that are currently loaded in the project.
Select the new ruleset in the Workspace view, and change its name in the Info view. Rename it to My First Ruleset.
Next, you need to select the appropriate rule template for your first rule from the Libraries view. We will create a basic clash rule, and the template we need for this is rule General intersection rule. This rule can be found in the library's Solibri Common Rules area (these are listed in alphabetical order).
Drag and drop a copy of this rule onto My First Ruleset in the Workspace view.
Select the General Intersection rule in the Workspace view and then rename it in the Info view to our requirement: MEP vs Structural Clashes.
-
To add a description, click Edit, change the description to "This rule checks for clashes between MEP and structural components" and click OK.

The description not only helps the users understand the rules purpose, but also reminds the author if they return to a partially completed rule.
-
MEP components can be checked for clashes against the structural model components, but to ensure that only real clashes are detected, non-geometric components, such as spaces and openings, can be excluded from the rule using the additional rows of the filter.
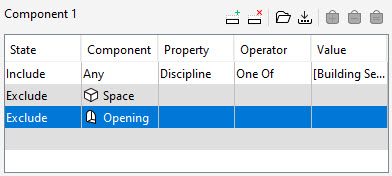
Go to the Parameters view. In the filter parameters, we can set Component 1 to include all MEP components. To add a new row, click
 and carry out the following configuration:
Leave the State as Include
Leave the Component as Any
For Property, select Discipline from the common parameter list values
Set the Operator to One of
Double click the Value field and select Building Services from the list. To accept the values, click OK and to return to the filter, click OK again.
Add a second row and carry out the following configuration:
Set the State to Exclude
Set the Component as Space
Add a third row and carry out the following configuration:
Set the State to Exclude
Set the Component as Opening
You should now have the following configuration for Component 1:
-
For Component 2, add a row and carry out the following configuration:
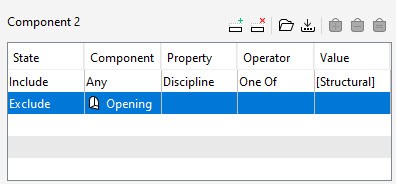
Leave the State as Include
Leave the Component as Any
For Property, select Discipline from the common parameter list values
Set the Operator to One of
Double click the Value field and select Structural from the list. To accept the values, click OK and to return to the filter, click OK again.
Add a second row and carry out the following configuration:
You should now have the following configuration for Component 2:
-
In Intersection Tolerances, set the tolerance for these initial checks to 5mm for both the horizontal and vertical values. Values of 0 will produce hard clash results. We will keep volume tolerance, the exceptions and the ignore intersections options to the default values:

Tip
Numerical input is controlled by the default unit settings. If no suffix is added, then the values adopt the default units. Adding a suffix will convert the value and defined unit to your current units.
Your new ruleset can be saved externally to be reused on other projects. To save your ruleset in the default ruleset directory, click the Save As (
 ) in the Workspace view toolbar. The ruleset file is automatically named, based on our ruleset name.
Go to the File menu, click Save Model As and save your project with the name Rulesets.
Now, you can test your new ruleset:
First, go to the Checking layout. You can see that your new ruleset is automatically loaded and ready to be tested.
Highlight the other rulesets and then right-click and select Disable from the context menu, so that only the new ruleset will be used in checking.
To see the results of clash rule you have created, click Check Model.
-
In the Results view, you can see a series of issues with ducts clashing with the suspended ceilings, along with the structural walls.
Important
Please be aware that any changes made in this way may affect the rule results potentially affecting previously created issues, removing them completely or orphaning them if they exist in a presentation. We recommend that any changes required to existing rules, where issues exist for the rule in question, are carried out in a copy of the project.
To manipulate the rule, right-click the rule in the Checking view and select Rule Parameters from the context menu.
-
You can refine the results in many ways with the additional functionality in the rule. Activate the volume tolerance and set the intersection volume to 0.005m3:
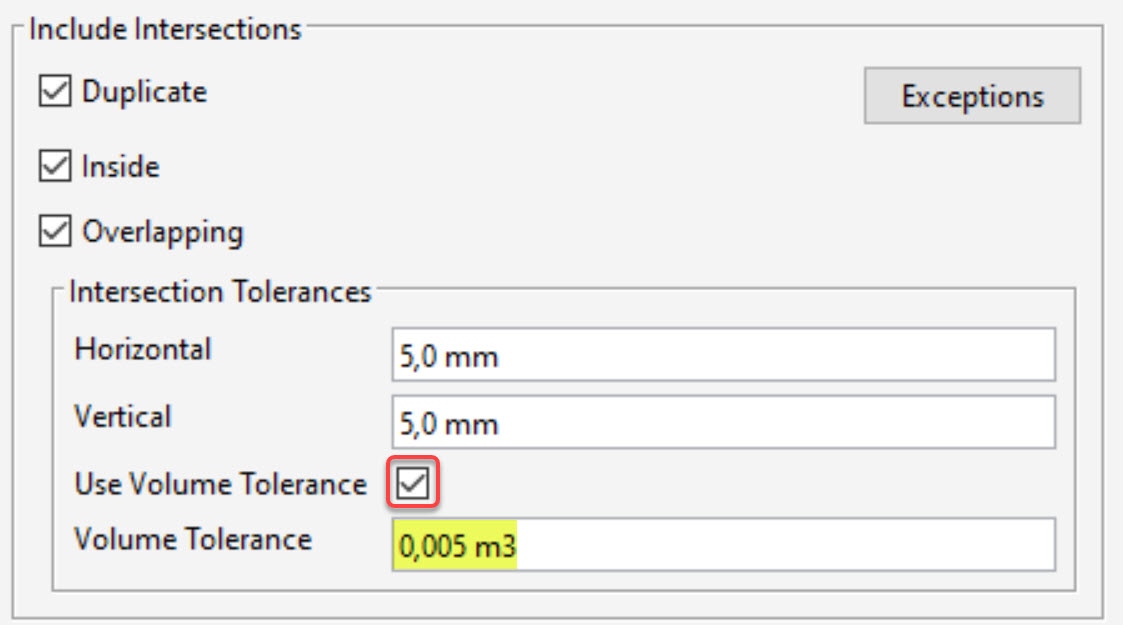
This will allow intersections that are below the horizontal and vertical tolerances but create only failures for elements that have a larger intersecting volume than specified.
A good example would be a pipe that clashes with a floor slab within the tolerance values provided. To chase a short channel in a floor slab for a small intersection, may be acceptable, but not so desirable over a longer distance.
-
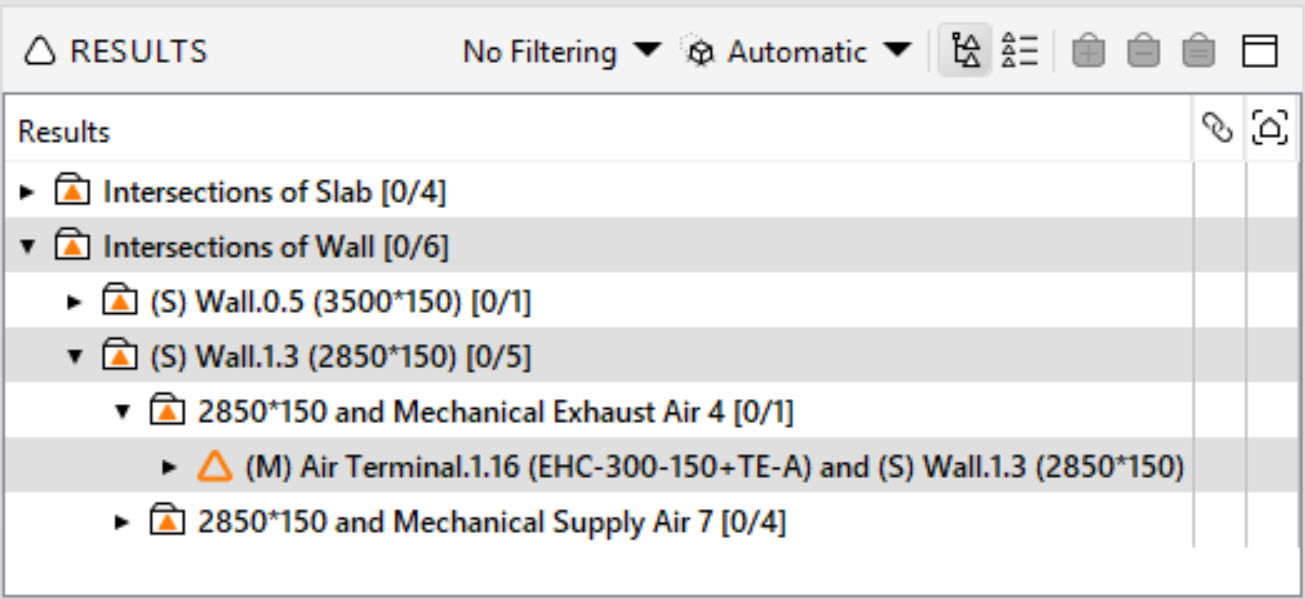
Close the rule parameters and re-check the model to see the effect of the changes. They now show only the larger intersecting volumes:
-
Go to File and close the model. A dialogue opens, asking if you want to save modified files:
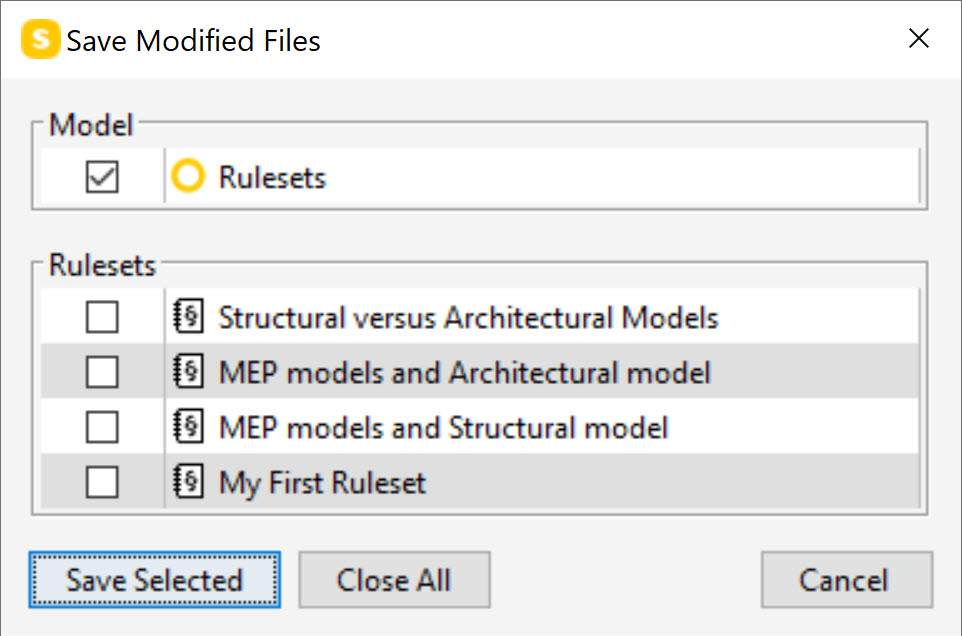
By default, if you’ve not saved the project since changes have occurred, the model will always be checked.
The resources, however, give the option of saving them outside of the current file. In this instance the ruleset has changed, and you are being asked if you want to overwrite the ruleset file saved externally. For resources that have not yet been saved this will automatically open a save dialogue for you to specify a location and filename for each new resource. Any resources that are not saved externally, i.e left de-checked, will still exist in this version of the file.
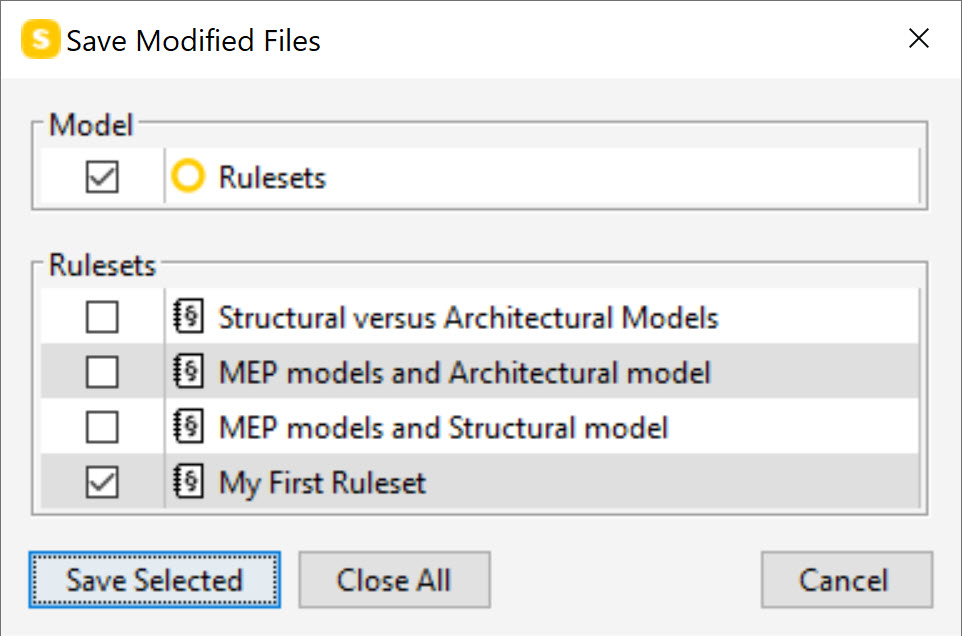
Select My First Ruleset and click Save Selected:
Congratulations, you have now completed the first part and created your very first ruleset within Solibri!